An important thing to understand about how Azure RMS works, is that this data protection service from Azure Information Protection, does not see or store your data as part of the protection process. Information that you protect is never sent to or stored in Azure, unless you explicitly store it in Azure or use another cloud service that stores it in Azure. Azure RMS simply makes the data in a document unreadable to anyone other than authorized users and services:
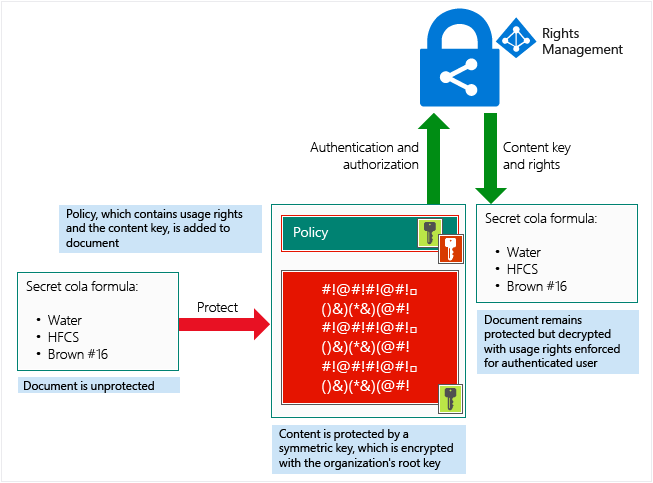
At a high level, you can see how this process works in the following picture. A document containing the secret formula is protected, and then successfully opened by an authorized user or service. The document is protected by a content key (the green key in this picture). It is unique for each document and is placed in the file header where it is protected by your Azure Information Protection tenant root key (the red key in this picture). Your tenant key can be generated and managed by Microsoft, or you can generate and manage your own tenant key.
Throughout the protection process when Azure RMS is encrypting and decrypting, authorizing, and enforcing restrictions, the secret formula is never sent to Azure.
For a detailed description of what’s happening, see the Walkthrough of how Azure RMS works: First use, content protection, content consumption section in this article.
For technical details about the algorithms and key lengths that Azure RMS uses, see the next section.
Even if you don't need to know in detail how this technology works, you might be asked about the cryptographic controls that it uses. For example, to confirm that the security protection is industry-standard.
256 bits is used by the Azure Information Protection client in the following scenarios:
2048 bits is the key length when the Azure Rights Management service is activated. 1024 bits is supported for the following optional scenarios:
For each document or email that is protected by Azure RMS, Azure RMS creates a single AES key (the "content key"), and that key is embedded to the document, and persists through editions of the document.
The content key is protected with the organization’s RSA key (the "Azure Information Protection tenant key") as part of the policy in the document, and the policy is also signed by the author of the document. This tenant key is common to all documents and emails that are protected by the Azure Rights Management service for the organization and this key can only be changed by an Azure Information Protection administrator if the organization is using a tenant key that is customer-managed (known as "bring your own key", or BYOK).
This tenant key is protected in Microsoft’s online services, in a highly controlled environment and under close monitoring. When you use a customer-managed tenant key (BYOK), this security is enhanced by the use of an array of high-end hardware security modules (HSMs) in each Azure region, without the ability for the keys to be extracted, exported, or shared under any circumstances. For more information about the tenant key and BYOK, see Planning and implementing your Azure Information Protection tenant key.
Licenses and certificates that are sent to a Windows device are protected with the client’s device private key, which is created the first time a user on the device uses Azure RMS. This private key, in turn, is protected with DPAPI on the client, which protects these secrets by using a key derived from the user’s password. On mobile devices, the keys are used only one time, so because they are not stored on the clients, these keys don’t need to be protected on the device.
To understand in more detail how Azure RMS works, let's walk through a typical flow after the Azure Rights Management service is activated and when a user first uses the Rights Management service on their Windows computer (a process sometimes known as initializing the user environment or bootstrapping), protects content (a document or email), and then consumes (opens and uses) content that has been protected by somebody else.
After the user environment is initialized, that user can then protect documents or consume protected documents on that computer.
If this user moves to another Windows computer, or another user uses this same Windows computer, the initialization process is repeated.
Before a user can protect content or consume protected content on a Windows computer, the user environment must be prepared on the device. This is a one-time process and happens automatically without user intervention when a user tries to protect or consume protected content:
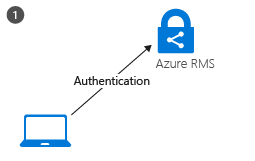
What's happening in step 1: The RMS client on the computer first connects to the Azure Rights Management service, and authenticates the user by using their Microsoft Entra account.
When the user’s account is federated with Microsoft Entra ID, this authentication is automatic and the user is not prompted for credentials.
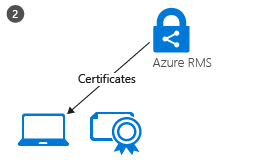
What's happening in step 2: After the user is authenticated, the connection is automatically redirected to the organization’s Azure Information Protection tenant, which issues certificates that let the user authenticate to the Azure Rights Management service in order to consume protected content and to protect content offline.
One of these certificates is the rights account certificate, often abbreviated to RAC. This certificate authenticates the user to Microsoft Entra ID and is valid for 31 days. The certificate is automatically renewed by the RMS client, providing the user account is still in Microsoft Entra ID and the account is enabled. This certificate is not configurable by an administrator.
A copy of this certificate is stored in Azure so that if the user moves to another device, the certificates are created by using the same keys.
When a user protects a document, the RMS client takes the following actions on an unprotected document:
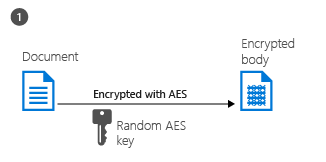
What's happening in step 1: The RMS client creates a random key (the content key) and encrypts the document using this key with the AES symmetric encryption algorithm.
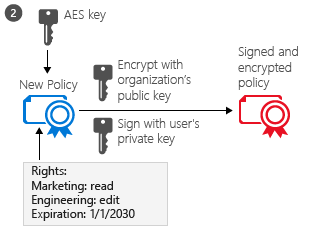
What's happening in step 2: The RMS client then creates a certificate that includes a policy for the document that includes the usage rights for users or groups, and other restrictions, such as an expiration date. These settings can be defined in a template that an administrator previously configured, or specified at the time the content is protected (sometimes referred to as an "ad hoc policy").
The main Microsoft Entra attribute used to identify the selected users and groups is the Microsoft Entra ProxyAddresses attribute, which stores all the email addresses for a user or group. However, if a user account doesn't have any values in the AD ProxyAddresses attribute, the user's UserPrincipalName value is used instead.
The RMS client then uses the organization’s key that was obtained when the user environment was initialized and uses this key to encrypt the policy and the symmetric content key. The RMS client also signs the policy with the user’s certificate that was obtained when the user environment was initialized.
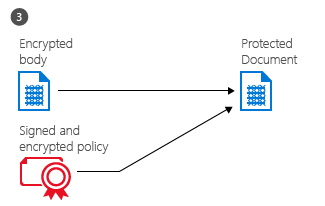
What's happening in step 3: Finally, the RMS client embeds the policy into a file with the body of the document encrypted previously, which together comprise a protected document.
This document can be stored anywhere or shared by using any method, and the policy always stays with the encrypted document.
When a user wants to consume a protected document, the RMS client starts by requesting access to the Azure Rights Management service:
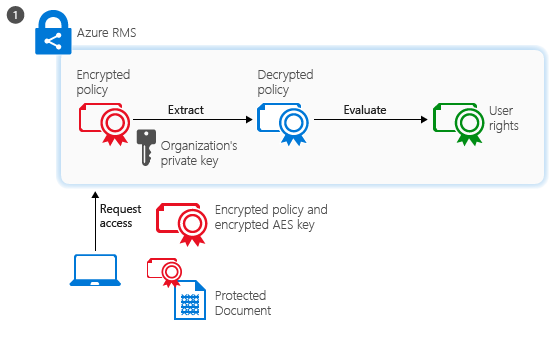
What's happening in step 1: The authenticated user sends the document policy and the user’s certificates to the Azure Rights Management service. The service decrypts and evaluates the policy, and builds a list of rights (if any) the user has for the document. To identify the user, the Microsoft Entra ProxyAddresses attribute is used for the user's account and groups to which the user is a member. For performance reasons, group membership is cached. If the user account has no values for the Microsoft Entra ProxyAddresses attribute, the value in the Microsoft Entra UserPrincipalName is used instead.
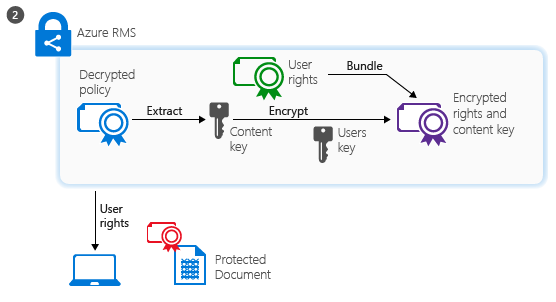
What's happening in step 2: The service then extracts the AES content key from the decrypted policy. This key is then encrypted with the user’s public RSA key that was obtained with the request.
The re-encrypted content key is then embedded into an encrypted use license with the list of user rights, which is then returned to the RMS client.
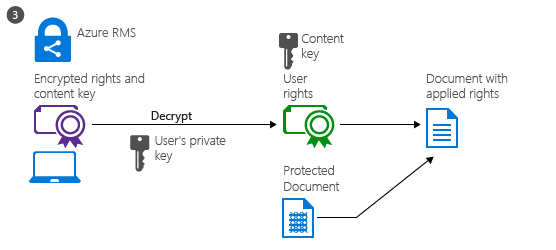
What's happening in step 3: Finally, the RMS client takes the encrypted use license and decrypts it with its own user private key. This lets the RMS client decrypt the document’s body as it is needed and render it on the screen.
The client also decrypts the rights list and passes them to the application, which enforces those rights in the application’s user interface.
When users who are external to your organization consume content that you've protected, the consumption flow is the same. What changes for this scenario, is how the user is authenticated. For more information, see When I share a protected document with somebody outside my company, how does that user get authenticated?
The preceding walkthroughs cover the standard scenarios but there are some variations:
To learn more about the Azure Rights Management service, use the other articles in the Understand & Explore section, such as How applications support the Azure Rights Management service to learn how your existing applications can integrate with Azure Rights Management to provide an information protection solution.
Review Terminology for Azure Information Protection so that you’re familiar with the terms that you might come across as you’re configuring and using the Azure Rights Management service, and be sure to also check Requirements for Azure Information Protection before you start your deployment. If you want to dive right in and try it out for yourself, use the quickstart and tutorials:
If you’re ready to start deploying data protection for your organization, use the AIP deployment roadmap for classification, labeling, and protection for your deployment steps and links for how-to instructions.